

Installing unsupported applications
This is actually the second part of Brad Linder's tutorial as posted in Download Squad. It is also the second tutorial on installing program in this blog. The first, Installing Programs on the Asus Eee PC, was posted earlier.There are three ways to install applications on the Eee PC.You can use the apt-get command in a terminal window.

With theSynaptic package manager will see a list of installed applications and a few uninstalled but available ones. You can also add repositories to gain access to other applications, though not all will be be compatible or may require more powerful configurations.
At any rate, just knowing and having access to more software will always come in handy, so check out the complete tutorial here.
----------
Additional information regarding Xandros (and Debian) repositories is available at the Eeeuser forum. It is highly recommended that readers read the entire Eeeuser article to familiarize themselves with what is compatible and what is not.
There are three ways to install applications on the Eee PC.You can use the apt-get command in a terminal window.
- You can download, uncompress, and install applications manually using a terminal. But it's not user friendly at all.
- You can use the Synaptic package manager which is a graphical interface for apt-get.
With theSynaptic package manager will see a list of installed applications and a few uninstalled but available ones. You can also add repositories to gain access to other applications, though not all will be be compatible or may require more powerful configurations.
At any rate, just knowing and having access to more software will always come in handy, so check out the complete tutorial here.
----------
Additional information regarding Xandros (and Debian) repositories is available at the Eeeuser forum. It is highly recommended that readers read the entire Eeeuser article to familiarize themselves with what is compatible and what is not.
Hacking the Eee PC
From Ars Technica, a good article regarding modding/hacking the Asus Eee PC. Some sample tips -
Virtual desktops
The Eee's small screen makes it difficult to see more than a few things at once, and switching between windows quickly becomes frustrating. Support for virtual desktops is one of the Eee basic model's coolest undocumented features. Out of the box, basic mode has four separate workspaces that you can switch between by holding Ctrl and Alt while pressing the left and right arrow keys. If you hold the shift key too, you can move the active window with you to a different workspace.
The Eee basic mode environment doesn't provide a graphical display of your workspaces, so it can be pretty easy to forget where you have your windows. To get a visual workspace display, you can run the kpager utility from the command line.
GVim and KPager running on the Eee.
You can also add a workspace switcher to the basic mode panel by creating an IceWM preferences file at ~/.icewm/preferences and adding the following lines:
TaskBarShowWorkspaces=1
WorkspaceNames=" 1 ", " 2 ", " 3 ", "
Installing extra IceWM themes
Alternate IceWM window themes can be downloaded from Freshmeat and installed into /usr/share/icewm/themes. Then, to switch between themes, add a theme chooser submenu to the IceWM start menu by adding the following line to ~/.icewm/preferences:
ShowThemesMenu=1

Fixing the fonts
By default, the Eee uses size 10 fonts in most of the programs, which may or may not to be your liking. Unfortunately, there is no central location where you can go to change all the font sizes. You have to configure the font sizes individually for Firefox, GTK, and KDE. To change the default KDE font size, launch the kcontrol utility from the command line, navigate to the Display/Themes/Fonts page, and change the font sizes.
The Eee doesn't come with the GNOME font configuration utility, so you will have to create a custom ~/.gtkrc file to set up a default GTK font. In my .gtkrc file, I also force GTK to omit labels from toolbar buttons in order to save more screen space. This is my ~/.gtkrc file on the Eee:
gtk-font-name = "Sans 8"To change the default interface font size in Firefox, you will have to modify the chrome css file, which is located at ~/.mozilla/firefox/*default/chrome/userChrome.css. This is what I put in my userChrome.css file to make the interface use font size 8:
gtk-toolbar-style = GTK_TOOLBAR_ICONS
* {
font-family: sans-serif !important;
font-size: 8pt !important;
}
You could probably also customize Thunderbird's default font size with a userChrome.css modification.You can read the complete article which lists a lot of other tips and info here.
Speeding Up OpenOffice
Speeding Up OpenOffice

gHack has posted a tip from Zolved on speeding up OpenOffice simply by editing some settings -
Start OpenOffice and click on Tools > Options to go to the configuration window. Click on Memory in the left menu and change the following settings:
* Number of Steps: 30
* Use for Open Office: 128
* Memory per Object: 20
* Number of Objects: 20
Click on Java in the left menu afterwards and uncheck Use a Java Runtime Environment.
Click OK and restart Open Office. It should now run faster.
Credit: http://asuseeehacks.blogspot.com/2008/08/speeding-up-openoffice.html
Open EEE PC To Advanced Mode
The first thing that should be done on the EeePc is to open Advanced mode which looks much more like a normal Linux OS with the launch button in the bottom right corner and you can change wallpaper etc etc.
Enabling to full desktop mode:
1. You need to open the console window - press ctrl-alt-T
2. Type in the console window: sudo apt-get install kicker ksmserver
3. I had to type step 2 twice
4. You will know when the process is complete because the user prompt at the console will return....
5. Restart your EeePc, it will load up in easy mode still, click the red power option button in the corner of the taskbar on the Eee and you will see a full desktop option.
6. Well done, you now have much more choice over your EeePc :D
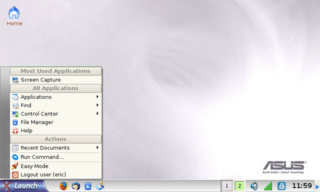
Screenshots of the Advance Mode:
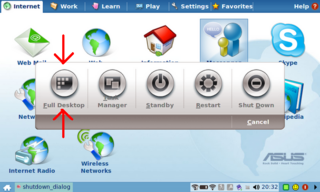
Booting In Advanced Mode:
1. Go to Settings ? Personalization
2. Click 'Full Desktop Mode' under Login Mode
3. Reboot your EeePc
4.You should now be in full desktop mode.
One possible problem is that booting directly into Advanced Mode ignores any settings requiring a password to be entered however booting into Easy Mode requires a password if you have selected there to be one.
Either way, it is highly suggested to have a go with the Advanced Mode as it gives much more function and use to the EeePc.
Credit:http://eeehacking.blogspot.com/2008/01/advanced-mode.html
Enabling to full desktop mode:
1. You need to open the console window - press ctrl-alt-T
2. Type in the console window: sudo apt-get install kicker ksmserver
3. I had to type step 2 twice
4. You will know when the process is complete because the user prompt at the console will return....
5. Restart your EeePc, it will load up in easy mode still, click the red power option button in the corner of the taskbar on the Eee and you will see a full desktop option.
6. Well done, you now have much more choice over your EeePc :D
Screenshots of the Advance Mode:


Booting In Advanced Mode:
1. Go to Settings ? Personalization
2. Click 'Full Desktop Mode' under Login Mode
3. Reboot your EeePc
4.You should now be in full desktop mode.
One possible problem is that booting directly into Advanced Mode ignores any settings requiring a password to be entered however booting into Easy Mode requires a password if you have selected there to be one.
Either way, it is highly suggested to have a go with the Advanced Mode as it gives much more function and use to the EeePc.
Credit:http://eeehacking.blogspot.com/2008/01/advanced-mode.html
Upgrading Memory on the Eee
Upgrading Memory on the Eee
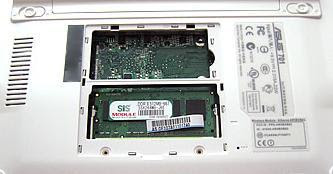
I upgraded the memory to 1gb today, that should be enough for the types of Applications and Operating Systems I wish to run.
I upgraded the memory to 1gb today, that should be enough for the types of Applications and Operating Systems I wish to run.

To upgrade the RAM simply:
1. Take off the VOID sticker, don't worry it doesn't void warranty!
2. Unscrew the plate and take it off
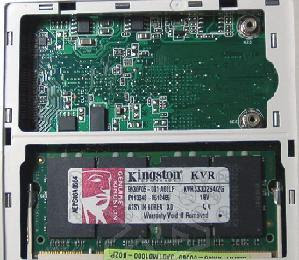
3. Push the 2 hinges at the side of the RAM stick away from it and the RAM stick will pop up.
4. Remove the memory, push in the new RAM stick and then click down.
5. Put the plate and screws back in.

Farewell EeePc
There has not been no active work on this blog for a few months now, mainly due to University work.
I have since sold the EeePc and brought the HP Mininote 2133, which for me has much better specs and a bigger keyboard.
If you do own a EEE, for maximum performance from the wonderful machine I would suggest:
*If using the default linux operating system, unlock the full adv mode - it is so much better.
*For Windows XP users, make sure you Nlite the install and search for the VGA scaling driver. This makes webpages inparticular look so much better. Don't forget useful applications: Firefox, VLC Player, Skype, LogMeIn to name a few!
*Anyone into computer security, hacking, network testing etc - install Backtrack 3 onto a SD card or removable media. This literally has almost every security tool you could need.
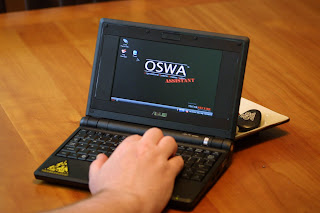
Booting OSWA on Eee PC with SD flash
These are some notes for making a bootable SD flash card for my Eee PC from the "OSWA Assistant" bootable CD.
A bootable or "live" CD is a popular way of distributing hacking tools. You just put the CD into any computer and boot from it (instead of your normal hard disk). You get a Linux desktop and pointers to a list of common programs. The most famous of these is probably the "Backtrack CD.
Another one for wireless auditing is "OSWA Assistant". I've never used it before, but they were handing out CDs at BlackHat 2008 Vegas.
The computer I want to use for this Asus Eee 2G Surf", a $299 disposable laptop. Everybody should probably have a handful of these around to play with.
The problem with the Eee PC is that it doesn't have a CD-ROM drive, so I can't boot the OSWA CD. However, it does have three USB ports and one SD flash port. The SD port is especially nice for booting. You can get 2-gig SD flash cards for $7; they are hella cheap.
To make a bootable SD card from the CD, I went through the following steps.
Step 1: I copied all the files to the SD card. I first put the SD flash card into my Windows PC which became the "D:" drive. I downloaded the latest oswa-assistant.iso image from the OSWA website, opened it in WinRAR on my Windows PC, and extracted all the files to the "D:" drive. You can use pretty much any tool for extracting the files, I just happened to have WinRAR handy. I didn't even know that WinRAR could extract files from ISOs - I just assumed that is the sort of thing that WinRAR ought to be able to do.
Step 2: I needed to make the flash bootable. Most bootable CDs use a tool called "isolinux" to go through the boot process. There is a sibling tool called "syslinux" for making bootable Linux flash devices, such as USB flash or SD flash. I downloaded the syslinux archive, extracted to "C:\syslinux". I opened a command prompt, went to "C:\syslinux\win32" and ran "syslinux.exe -ma D:" to make the SD card bootable.
Step 3: I had to change the "isolinux" configuration to a "syslinux" one. I renamed the "D:\boot\isolinux" directory to a "D:\boot\syslinux" directory instead. I also had to rename the "isolinux.cfg" file in that directory to "syslinux.cfg".
Step 4: I had to configure the Eee PC to boot from SD, otherwise it will boot from its own hard disk. When the system boots, I hit "F2" to go into the BIOS configuration, and change the boot order so that Removable Devices are at the top of the list.
At this point, the system boots. However, there several problems. First, it complains "You passed an undefined mode number.", which refers to the fact that it doesn't understand something about the text mode screen. Simply hit to continue.
When it reaches "Starting udev hot-plug hardware detection...", it will hang for a while with the message "Starting udev hot-plug hardware detection… udevd-event[2706]: run_program: '/sbin/modprobe' abnormal exit". Don't worry, it will continue on with the boot process after about 5 minutes. It's a bit annoying though. I wish I knew what was failing.
Step 5: There was one fatal error. X Windows hangs looking for an AGP card. The In order to fix this, I had to edit the "D:\boot\syslinux\syslinux.cfg" file and put "noagp" on the second line:
APPEND ramdisk_size=100000 init=/etc/init lang=us apm=power-off vga=791 initrd=minirt.gz nomce loglevel=0 quiet BOOT_IMAGE=oswa noagp
Step 6: Profit!
Credit:http://erratasec.blogspot.com/2008/08/booting-oswa-on-eee-pc-with-sd-flash.html
A bootable or "live" CD is a popular way of distributing hacking tools. You just put the CD into any computer and boot from it (instead of your normal hard disk). You get a Linux desktop and pointers to a list of common programs. The most famous of these is probably the "Backtrack CD.
Another one for wireless auditing is "OSWA Assistant". I've never used it before, but they were handing out CDs at BlackHat 2008 Vegas.
The computer I want to use for this Asus Eee 2G Surf", a $299 disposable laptop. Everybody should probably have a handful of these around to play with.
The problem with the Eee PC is that it doesn't have a CD-ROM drive, so I can't boot the OSWA CD. However, it does have three USB ports and one SD flash port. The SD port is especially nice for booting. You can get 2-gig SD flash cards for $7; they are hella cheap.
To make a bootable SD card from the CD, I went through the following steps.
Step 1: I copied all the files to the SD card. I first put the SD flash card into my Windows PC which became the "D:" drive. I downloaded the latest oswa-assistant.iso image from the OSWA website, opened it in WinRAR on my Windows PC, and extracted all the files to the "D:" drive. You can use pretty much any tool for extracting the files, I just happened to have WinRAR handy. I didn't even know that WinRAR could extract files from ISOs - I just assumed that is the sort of thing that WinRAR ought to be able to do.
Step 2: I needed to make the flash bootable. Most bootable CDs use a tool called "isolinux" to go through the boot process. There is a sibling tool called "syslinux" for making bootable Linux flash devices, such as USB flash or SD flash. I downloaded the syslinux archive, extracted to "C:\syslinux". I opened a command prompt, went to "C:\syslinux\win32" and ran "syslinux.exe -ma D:" to make the SD card bootable.
Step 3: I had to change the "isolinux" configuration to a "syslinux" one. I renamed the "D:\boot\isolinux" directory to a "D:\boot\syslinux" directory instead. I also had to rename the "isolinux.cfg" file in that directory to "syslinux.cfg".
Step 4: I had to configure the Eee PC to boot from SD, otherwise it will boot from its own hard disk. When the system boots, I hit "F2" to go into the BIOS configuration, and change the boot order so that Removable Devices are at the top of the list.
At this point, the system boots. However, there several problems. First, it complains "You passed an undefined mode number.", which refers to the fact that it doesn't understand something about the text mode screen. Simply hit to continue.
When it reaches "Starting udev hot-plug hardware detection...", it will hang for a while with the message "Starting udev hot-plug hardware detection… udevd-event[2706]: run_program: '/sbin/modprobe' abnormal exit". Don't worry, it will continue on with the boot process after about 5 minutes. It's a bit annoying though. I wish I knew what was failing.
Step 5: There was one fatal error. X Windows hangs looking for an AGP card. The In order to fix this, I had to edit the "D:\boot\syslinux\syslinux.cfg" file and put "noagp" on the second line:
APPEND ramdisk_size=100000 init=/etc/init lang=us apm=power-off vga=791 initrd=minirt.gz nomce loglevel=0 quiet BOOT_IMAGE=oswa noagp
Step 6: Profit!

Credit:http://erratasec.blogspot.com/2008/08/booting-oswa-on-eee-pc-with-sd-flash.html
Hack Your Eee PC Custom Laptop
With three of the best Eee PC hacks on the net. Build your own custom laptop computers with these simple hacks.
Since the release of the famed Eee PC there has been ample time for enthusiasts to dig deeper inside the machine and as a result, there are a number of useful hacks emerging.

We picked out three of the best hacks that can transform your Eee PC into a top-of-the range-Laptop.
Install Ubuntu
If you’re a Linux user at heart, there is probably going to be time when you want to try out Ubuntu’s familiar desktop.

To do this you will need to download Ubuntu Eee, a community driven derivative of Ubuntu which is specifically designed for Eee Laptops; you must also configure the Eee PC to boot from flash media.
This is probably the hardest part of the process; first you will need a small application which burns ISO images to flash drives. A popular program for doing this is called UNetbootin which is available along with the latest version of Ubuntu Eee installation from the Ubuntu website.
Then you must format the Eee Pc’s SD card using a machine running Ubuntu. This is where it gets a little tricky; you can use the dd command to fix the SD card’s MBR.
dd if=/usr/lib/syslinux/mbr.bin of=[type the correct device path within these brackets]
Next you must erase the existing partitions on the SD card and create a new one that is formatted with FAT32 and set with the bootable flag. A tool called gparted can you help you complete this.
Now all that is left to do is burn the ISO image to the SD card; if you have to manually select the location do so with extreme care because the target drive can be overwritten.
Then boot from SD; hold ‘Escape’ during the startup screen and select ‘USB 2.0 Card Reader SD0’ from the menu.

Once you’re up and running follow the installation process, this may take a while but there are no special setting you must configure. Once the install is complete, your machine should be running Ubuntu with no problems.
Note: 800HighTech can not be held responsible for your actions. This process can cause serious system problems and loss of data, so please proceed with caution.
Hardwire Almost Everything To Your Eee PC
When it comes to modifying the Eee PC, this one we found over at the ivancover.com wiki, surely takes first prize. While a very small percentage of the public would be able to match such hack, it’s amazing to see how much can fit inside this neat little notebook, check out the list of components and pictures below.

USB hubs - 11.20 USD
GPS module - 36.70 USD
Bluetooth - 5.65 USD
SDHC card reader - 6.45 USD
Adata SDHC 8 GB - 74.50 USD
Corsair VoyagerGT 4 GB USB drive - 90.94 USD
Switch + Prototypingboards - 2.66 + 30.10 USD
Intel Wireless adapter - 62.69 USD
Airplay FM transmitter - 14.98 USD
Conexant Modem - 11.89 USD
Crucial 2 GB DDR2 module - 106.62 USD
USB hub

USB hub disassembled and fixed to the motherboard

GPS Antenna disassembled

GPS Antenna fitted in the LED hood


GPS fitted to the motherboard

Bluetooth Adaptor

Bluetooth disassembled and fitted in the LED hood

SD Card Reader

Disassembled card reader

Card reader attached to the motherboard

Flash Drive

Flash drive disassembled

Flash drive attached to the motherboard

Wifi upgrade

New wireless Intel 4965AGN for Mini PCI-express

Wifi disassembled and attached to the motherboard

FM transmitter
FM transmitter disassembled
Antenna attached to the motherboard
Circuit board attached to the motherboard
Modem disassembled

Modem attached to the motherboard

Touch Screen

Remove the LCD and anti-glare filter

Touch screen controller board

The touch screen controller board attached to the motherboard

Overlay the touch screen

Completed touch screen mod

If this mod is way out of your league, read the next Eee PC hack that’s a little less technical but just as practical.
Mod Your Eee PC Without Solder
By fitting a pair of newly installed internal USB ports which connect to the miniPCIe adaptor, you can upgrade your system with a Bluetooth radio and a 16 GB Corsair Flash Voyager drive.

The best part about this hack is that these devices can be removed or changed at anytime because none of the components are soldered to the motherboard.
Are you a military member looking for the best laptops and computers available on the market, but do not have the cash to buy one? Apply for financing and receive the most popular electronics direct to your barracks - Even Before Your First Payment! Low monthly payments and Zero Money Down - Regardless of Bad Credit History.
Credit:http://blog.800hightech.com/hack-eee-pc-asus-custom-laptop/1888/
Google Reader to work on the EeePC
One thing I’ve been meaning to blog about but haven’t got round to is my lovely new toy, an Asus EeePC. I bought one partly on a shiny-craving whim, partly because I wanted a genuinely portable computer, and partly because I think the anti-feature-bloat approach that they took with it is something that should be generally encouraged. So I encouraged it, with money.
It’s a really neat little machine, and I’m very, very fond of it - I’ve been using it almost to the complete exclusion of my trusty old ThinkPad, largely from the sheer pleasure of having something that starts up in 25 seconds, shuts down in 12, and doesn’t interrupt what I’m doing every half an hour to nag me about some software update or another.
It does take a little getting used to, however - the keyboard is fine, although I’m still not as quick on it as I am on a regular sized one, and I wonder how well someone who doesn’t have my tiny, childlike fingers would cope. The small screen is also a little odd at first, but by and large works with most things that you need it to - you just need to get used to CTRL-plussing and -minusing a bit more than normal to optimize the font size for the screen. The one site I regularly use that was causing me grief, however, was Google Reader.
The problem essentially is that the main menu (the bit in the upper left with the Home, All Items, etc options) takes up a fixed amount of real-estate, which squeezes the list of your subscriptions - the actual meat and potatoes of the reader - into whatever space is left. Which on the Eee, is precious little. In fact, it only manages to fit in two lines, making it all but useless for looking over your feeds to see what’s new:
Even doing the old CTRL-minus to reduce the text size doesn’t help much - by the time you’ve got a usable number of lines, the text is all but illegible: The solution, after a bit of monkeying about, turns out to be twofold. Most obviously, F11 gets rid of the taskbar at the bottom of the screen, giving you a fair bit more to play with. The extra help comes from using Greasemonkey, by way of grabbing Lifehacker’s Better GReader extension. This lets you fiddle about with the look of Google Reader - the option you want to use is the Minimalistic skin, which lets you get rid of the top bar on Google Reader by simply tapping W. The combination of these two gives you plenty of real estate to browse your feeds in, even with the normal chunky text size: You can, of course, give yourself even more to play with by reducing the text size a bit - it’s still legible with one, or even two, reductions. Not a terribly complex or hard-to-figure out fix, but I couldn’t see it noted down anywhere on a cursory google, so I thought I’d put it here in case anybody else was gnashing their teeth over the issue…


Credit:http://www.flashboy.org/blog/?p=295
Subscribe to:
Posts (Atom)


 My StumbleUpon Page