

Installing unsupported applications
This is actually the second part of Brad Linder's tutorial as posted in Download Squad. It is also the second tutorial on installing program in this blog. The first, Installing Programs on the Asus Eee PC, was posted earlier.There are three ways to install applications on the Eee PC.You can use the apt-get command in a terminal window.

With theSynaptic package manager will see a list of installed applications and a few uninstalled but available ones. You can also add repositories to gain access to other applications, though not all will be be compatible or may require more powerful configurations.
At any rate, just knowing and having access to more software will always come in handy, so check out the complete tutorial here.
----------
Additional information regarding Xandros (and Debian) repositories is available at the Eeeuser forum. It is highly recommended that readers read the entire Eeeuser article to familiarize themselves with what is compatible and what is not.
There are three ways to install applications on the Eee PC.You can use the apt-get command in a terminal window.
- You can download, uncompress, and install applications manually using a terminal. But it's not user friendly at all.
- You can use the Synaptic package manager which is a graphical interface for apt-get.
With theSynaptic package manager will see a list of installed applications and a few uninstalled but available ones. You can also add repositories to gain access to other applications, though not all will be be compatible or may require more powerful configurations.
At any rate, just knowing and having access to more software will always come in handy, so check out the complete tutorial here.
----------
Additional information regarding Xandros (and Debian) repositories is available at the Eeeuser forum. It is highly recommended that readers read the entire Eeeuser article to familiarize themselves with what is compatible and what is not.
Hacking the Eee PC
From Ars Technica, a good article regarding modding/hacking the Asus Eee PC. Some sample tips -
Virtual desktops
The Eee's small screen makes it difficult to see more than a few things at once, and switching between windows quickly becomes frustrating. Support for virtual desktops is one of the Eee basic model's coolest undocumented features. Out of the box, basic mode has four separate workspaces that you can switch between by holding Ctrl and Alt while pressing the left and right arrow keys. If you hold the shift key too, you can move the active window with you to a different workspace.
The Eee basic mode environment doesn't provide a graphical display of your workspaces, so it can be pretty easy to forget where you have your windows. To get a visual workspace display, you can run the kpager utility from the command line.
GVim and KPager running on the Eee.
You can also add a workspace switcher to the basic mode panel by creating an IceWM preferences file at ~/.icewm/preferences and adding the following lines:
TaskBarShowWorkspaces=1
WorkspaceNames=" 1 ", " 2 ", " 3 ", "
Installing extra IceWM themes
Alternate IceWM window themes can be downloaded from Freshmeat and installed into /usr/share/icewm/themes. Then, to switch between themes, add a theme chooser submenu to the IceWM start menu by adding the following line to ~/.icewm/preferences:
ShowThemesMenu=1

Fixing the fonts
By default, the Eee uses size 10 fonts in most of the programs, which may or may not to be your liking. Unfortunately, there is no central location where you can go to change all the font sizes. You have to configure the font sizes individually for Firefox, GTK, and KDE. To change the default KDE font size, launch the kcontrol utility from the command line, navigate to the Display/Themes/Fonts page, and change the font sizes.
The Eee doesn't come with the GNOME font configuration utility, so you will have to create a custom ~/.gtkrc file to set up a default GTK font. In my .gtkrc file, I also force GTK to omit labels from toolbar buttons in order to save more screen space. This is my ~/.gtkrc file on the Eee:
gtk-font-name = "Sans 8"To change the default interface font size in Firefox, you will have to modify the chrome css file, which is located at ~/.mozilla/firefox/*default/chrome/userChrome.css. This is what I put in my userChrome.css file to make the interface use font size 8:
gtk-toolbar-style = GTK_TOOLBAR_ICONS
* {
font-family: sans-serif !important;
font-size: 8pt !important;
}
You could probably also customize Thunderbird's default font size with a userChrome.css modification.You can read the complete article which lists a lot of other tips and info here.
Speeding Up OpenOffice
Speeding Up OpenOffice

gHack has posted a tip from Zolved on speeding up OpenOffice simply by editing some settings -
Start OpenOffice and click on Tools > Options to go to the configuration window. Click on Memory in the left menu and change the following settings:
* Number of Steps: 30
* Use for Open Office: 128
* Memory per Object: 20
* Number of Objects: 20
Click on Java in the left menu afterwards and uncheck Use a Java Runtime Environment.
Click OK and restart Open Office. It should now run faster.
Credit: http://asuseeehacks.blogspot.com/2008/08/speeding-up-openoffice.html
Open EEE PC To Advanced Mode
The first thing that should be done on the EeePc is to open Advanced mode which looks much more like a normal Linux OS with the launch button in the bottom right corner and you can change wallpaper etc etc.
Enabling to full desktop mode:
1. You need to open the console window - press ctrl-alt-T
2. Type in the console window: sudo apt-get install kicker ksmserver
3. I had to type step 2 twice
4. You will know when the process is complete because the user prompt at the console will return....
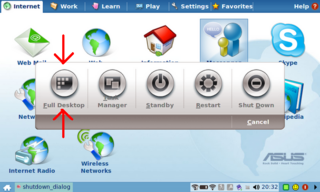
5. Restart your EeePc, it will load up in easy mode still, click the red power option button in the corner of the taskbar on the Eee and you will see a full desktop option.
6. Well done, you now have much more choice over your EeePc :D
Screenshots of the Advance Mode:
Booting In Advanced Mode:
1. Go to Settings ? Personalization
2. Click 'Full Desktop Mode' under Login Mode
3. Reboot your EeePc
4.You should now be in full desktop mode.
One possible problem is that booting directly into Advanced Mode ignores any settings requiring a password to be entered however booting into Easy Mode requires a password if you have selected there to be one.
Either way, it is highly suggested to have a go with the Advanced Mode as it gives much more function and use to the EeePc.
Credit:http://eeehacking.blogspot.com/2008/01/advanced-mode.html
Enabling to full desktop mode:
1. You need to open the console window - press ctrl-alt-T
2. Type in the console window: sudo apt-get install kicker ksmserver
3. I had to type step 2 twice
4. You will know when the process is complete because the user prompt at the console will return....
5. Restart your EeePc, it will load up in easy mode still, click the red power option button in the corner of the taskbar on the Eee and you will see a full desktop option.
6. Well done, you now have much more choice over your EeePc :D
Screenshots of the Advance Mode:


Booting In Advanced Mode:
1. Go to Settings ? Personalization
2. Click 'Full Desktop Mode' under Login Mode
3. Reboot your EeePc
4.You should now be in full desktop mode.
One possible problem is that booting directly into Advanced Mode ignores any settings requiring a password to be entered however booting into Easy Mode requires a password if you have selected there to be one.
Either way, it is highly suggested to have a go with the Advanced Mode as it gives much more function and use to the EeePc.
Credit:http://eeehacking.blogspot.com/2008/01/advanced-mode.html
Upgrading Memory on the Eee
Upgrading Memory on the Eee
I upgraded the memory to 1gb today, that should be enough for the types of Applications and Operating Systems I wish to run.
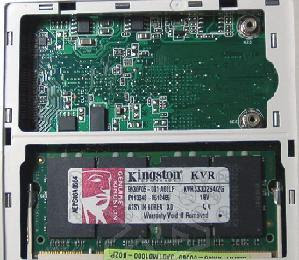
I upgraded the memory to 1gb today, that should be enough for the types of Applications and Operating Systems I wish to run.

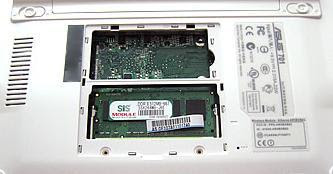
To upgrade the RAM simply:
1. Take off the VOID sticker, don't worry it doesn't void warranty!
2. Unscrew the plate and take it off
3. Push the 2 hinges at the side of the RAM stick away from it and the RAM stick will pop up.
4. Remove the memory, push in the new RAM stick and then click down.
5. Put the plate and screws back in.

Farewell EeePc
There has not been no active work on this blog for a few months now, mainly due to University work.
I have since sold the EeePc and brought the HP Mininote 2133, which for me has much better specs and a bigger keyboard.
If you do own a EEE, for maximum performance from the wonderful machine I would suggest:
*If using the default linux operating system, unlock the full adv mode - it is so much better.
*For Windows XP users, make sure you Nlite the install and search for the VGA scaling driver. This makes webpages inparticular look so much better. Don't forget useful applications: Firefox, VLC Player, Skype, LogMeIn to name a few!
*Anyone into computer security, hacking, network testing etc - install Backtrack 3 onto a SD card or removable media. This literally has almost every security tool you could need.
Booting OSWA on Eee PC with SD flash
These are some notes for making a bootable SD flash card for my Eee PC from the "OSWA Assistant" bootable CD.
A bootable or "live" CD is a popular way of distributing hacking tools. You just put the CD into any computer and boot from it (instead of your normal hard disk). You get a Linux desktop and pointers to a list of common programs. The most famous of these is probably the "Backtrack CD.
Another one for wireless auditing is "OSWA Assistant". I've never used it before, but they were handing out CDs at BlackHat 2008 Vegas.
The computer I want to use for this Asus Eee 2G Surf", a $299 disposable laptop. Everybody should probably have a handful of these around to play with.
The problem with the Eee PC is that it doesn't have a CD-ROM drive, so I can't boot the OSWA CD. However, it does have three USB ports and one SD flash port. The SD port is especially nice for booting. You can get 2-gig SD flash cards for $7; they are hella cheap.
To make a bootable SD card from the CD, I went through the following steps.
Step 1: I copied all the files to the SD card. I first put the SD flash card into my Windows PC which became the "D:" drive. I downloaded the latest oswa-assistant.iso image from the OSWA website, opened it in WinRAR on my Windows PC, and extracted all the files to the "D:" drive. You can use pretty much any tool for extracting the files, I just happened to have WinRAR handy. I didn't even know that WinRAR could extract files from ISOs - I just assumed that is the sort of thing that WinRAR ought to be able to do.
Step 2: I needed to make the flash bootable. Most bootable CDs use a tool called "isolinux" to go through the boot process. There is a sibling tool called "syslinux" for making bootable Linux flash devices, such as USB flash or SD flash. I downloaded the syslinux archive, extracted to "C:\syslinux". I opened a command prompt, went to "C:\syslinux\win32" and ran "syslinux.exe -ma D:" to make the SD card bootable.
Step 3: I had to change the "isolinux" configuration to a "syslinux" one. I renamed the "D:\boot\isolinux" directory to a "D:\boot\syslinux" directory instead. I also had to rename the "isolinux.cfg" file in that directory to "syslinux.cfg".
Step 4: I had to configure the Eee PC to boot from SD, otherwise it will boot from its own hard disk. When the system boots, I hit "F2" to go into the BIOS configuration, and change the boot order so that Removable Devices are at the top of the list.
At this point, the system boots. However, there several problems. First, it complains "You passed an undefined mode number.", which refers to the fact that it doesn't understand something about the text mode screen. Simply hit to continue.
When it reaches "Starting udev hot-plug hardware detection...", it will hang for a while with the message "Starting udev hot-plug hardware detection… udevd-event[2706]: run_program: '/sbin/modprobe' abnormal exit". Don't worry, it will continue on with the boot process after about 5 minutes. It's a bit annoying though. I wish I knew what was failing.
Step 5: There was one fatal error. X Windows hangs looking for an AGP card. The In order to fix this, I had to edit the "D:\boot\syslinux\syslinux.cfg" file and put "noagp" on the second line:
APPEND ramdisk_size=100000 init=/etc/init lang=us apm=power-off vga=791 initrd=minirt.gz nomce loglevel=0 quiet BOOT_IMAGE=oswa noagp
Step 6: Profit!
Credit:http://erratasec.blogspot.com/2008/08/booting-oswa-on-eee-pc-with-sd-flash.html
A bootable or "live" CD is a popular way of distributing hacking tools. You just put the CD into any computer and boot from it (instead of your normal hard disk). You get a Linux desktop and pointers to a list of common programs. The most famous of these is probably the "Backtrack CD.
Another one for wireless auditing is "OSWA Assistant". I've never used it before, but they were handing out CDs at BlackHat 2008 Vegas.
The computer I want to use for this Asus Eee 2G Surf", a $299 disposable laptop. Everybody should probably have a handful of these around to play with.
The problem with the Eee PC is that it doesn't have a CD-ROM drive, so I can't boot the OSWA CD. However, it does have three USB ports and one SD flash port. The SD port is especially nice for booting. You can get 2-gig SD flash cards for $7; they are hella cheap.
To make a bootable SD card from the CD, I went through the following steps.
Step 1: I copied all the files to the SD card. I first put the SD flash card into my Windows PC which became the "D:" drive. I downloaded the latest oswa-assistant.iso image from the OSWA website, opened it in WinRAR on my Windows PC, and extracted all the files to the "D:" drive. You can use pretty much any tool for extracting the files, I just happened to have WinRAR handy. I didn't even know that WinRAR could extract files from ISOs - I just assumed that is the sort of thing that WinRAR ought to be able to do.
Step 2: I needed to make the flash bootable. Most bootable CDs use a tool called "isolinux" to go through the boot process. There is a sibling tool called "syslinux" for making bootable Linux flash devices, such as USB flash or SD flash. I downloaded the syslinux archive, extracted to "C:\syslinux". I opened a command prompt, went to "C:\syslinux\win32" and ran "syslinux.exe -ma D:" to make the SD card bootable.
Step 3: I had to change the "isolinux" configuration to a "syslinux" one. I renamed the "D:\boot\isolinux" directory to a "D:\boot\syslinux" directory instead. I also had to rename the "isolinux.cfg" file in that directory to "syslinux.cfg".
Step 4: I had to configure the Eee PC to boot from SD, otherwise it will boot from its own hard disk. When the system boots, I hit "F2" to go into the BIOS configuration, and change the boot order so that Removable Devices are at the top of the list.
At this point, the system boots. However, there several problems. First, it complains "You passed an undefined mode number.", which refers to the fact that it doesn't understand something about the text mode screen. Simply hit to continue.
When it reaches "Starting udev hot-plug hardware detection...", it will hang for a while with the message "Starting udev hot-plug hardware detection… udevd-event[2706]: run_program: '/sbin/modprobe' abnormal exit". Don't worry, it will continue on with the boot process after about 5 minutes. It's a bit annoying though. I wish I knew what was failing.
Step 5: There was one fatal error. X Windows hangs looking for an AGP card. The In order to fix this, I had to edit the "D:\boot\syslinux\syslinux.cfg" file and put "noagp" on the second line:
APPEND ramdisk_size=100000 init=/etc/init lang=us apm=power-off vga=791 initrd=minirt.gz nomce loglevel=0 quiet BOOT_IMAGE=oswa noagp
Step 6: Profit!

Credit:http://erratasec.blogspot.com/2008/08/booting-oswa-on-eee-pc-with-sd-flash.html
Hack Your Eee PC Custom Laptop
With three of the best Eee PC hacks on the net. Build your own custom laptop computers with these simple hacks.
Since the release of the famed Eee PC there has been ample time for enthusiasts to dig deeper inside the machine and as a result, there are a number of useful hacks emerging.

We picked out three of the best hacks that can transform your Eee PC into a top-of-the range-Laptop.
Install Ubuntu
If you’re a Linux user at heart, there is probably going to be time when you want to try out Ubuntu’s familiar desktop.

To do this you will need to download Ubuntu Eee, a community driven derivative of Ubuntu which is specifically designed for Eee Laptops; you must also configure the Eee PC to boot from flash media.
This is probably the hardest part of the process; first you will need a small application which burns ISO images to flash drives. A popular program for doing this is called UNetbootin which is available along with the latest version of Ubuntu Eee installation from the Ubuntu website.
Then you must format the Eee Pc’s SD card using a machine running Ubuntu. This is where it gets a little tricky; you can use the dd command to fix the SD card’s MBR.
dd if=/usr/lib/syslinux/mbr.bin of=[type the correct device path within these brackets]
Next you must erase the existing partitions on the SD card and create a new one that is formatted with FAT32 and set with the bootable flag. A tool called gparted can you help you complete this.
Now all that is left to do is burn the ISO image to the SD card; if you have to manually select the location do so with extreme care because the target drive can be overwritten.
Then boot from SD; hold ‘Escape’ during the startup screen and select ‘USB 2.0 Card Reader SD0’ from the menu.

Once you’re up and running follow the installation process, this may take a while but there are no special setting you must configure. Once the install is complete, your machine should be running Ubuntu with no problems.
Note: 800HighTech can not be held responsible for your actions. This process can cause serious system problems and loss of data, so please proceed with caution.
Hardwire Almost Everything To Your Eee PC
When it comes to modifying the Eee PC, this one we found over at the ivancover.com wiki, surely takes first prize. While a very small percentage of the public would be able to match such hack, it’s amazing to see how much can fit inside this neat little notebook, check out the list of components and pictures below.

USB hubs - 11.20 USD
GPS module - 36.70 USD
Bluetooth - 5.65 USD
SDHC card reader - 6.45 USD
Adata SDHC 8 GB - 74.50 USD
Corsair VoyagerGT 4 GB USB drive - 90.94 USD
Switch + Prototypingboards - 2.66 + 30.10 USD
Intel Wireless adapter - 62.69 USD
Airplay FM transmitter - 14.98 USD
Conexant Modem - 11.89 USD
Crucial 2 GB DDR2 module - 106.62 USD
USB hub

USB hub disassembled and fixed to the motherboard

GPS Antenna disassembled

GPS Antenna fitted in the LED hood


GPS fitted to the motherboard

Bluetooth Adaptor

Bluetooth disassembled and fitted in the LED hood

SD Card Reader

Disassembled card reader

Card reader attached to the motherboard

Flash Drive

Flash drive disassembled

Flash drive attached to the motherboard

Wifi upgrade

New wireless Intel 4965AGN for Mini PCI-express

Wifi disassembled and attached to the motherboard

FM transmitter
FM transmitter disassembled
Antenna attached to the motherboard
Circuit board attached to the motherboard
Modem disassembled

Modem attached to the motherboard

Touch Screen

Remove the LCD and anti-glare filter

Touch screen controller board

The touch screen controller board attached to the motherboard

Overlay the touch screen

Completed touch screen mod

If this mod is way out of your league, read the next Eee PC hack that’s a little less technical but just as practical.
Mod Your Eee PC Without Solder
By fitting a pair of newly installed internal USB ports which connect to the miniPCIe adaptor, you can upgrade your system with a Bluetooth radio and a 16 GB Corsair Flash Voyager drive.

The best part about this hack is that these devices can be removed or changed at anytime because none of the components are soldered to the motherboard.
Are you a military member looking for the best laptops and computers available on the market, but do not have the cash to buy one? Apply for financing and receive the most popular electronics direct to your barracks - Even Before Your First Payment! Low monthly payments and Zero Money Down - Regardless of Bad Credit History.
Credit:http://blog.800hightech.com/hack-eee-pc-asus-custom-laptop/1888/
Google Reader to work on the EeePC
One thing I’ve been meaning to blog about but haven’t got round to is my lovely new toy, an Asus EeePC. I bought one partly on a shiny-craving whim, partly because I wanted a genuinely portable computer, and partly because I think the anti-feature-bloat approach that they took with it is something that should be generally encouraged. So I encouraged it, with money.
It’s a really neat little machine, and I’m very, very fond of it - I’ve been using it almost to the complete exclusion of my trusty old ThinkPad, largely from the sheer pleasure of having something that starts up in 25 seconds, shuts down in 12, and doesn’t interrupt what I’m doing every half an hour to nag me about some software update or another.
It does take a little getting used to, however - the keyboard is fine, although I’m still not as quick on it as I am on a regular sized one, and I wonder how well someone who doesn’t have my tiny, childlike fingers would cope. The small screen is also a little odd at first, but by and large works with most things that you need it to - you just need to get used to CTRL-plussing and -minusing a bit more than normal to optimize the font size for the screen. The one site I regularly use that was causing me grief, however, was Google Reader.
The problem essentially is that the main menu (the bit in the upper left with the Home, All Items, etc options) takes up a fixed amount of real-estate, which squeezes the list of your subscriptions - the actual meat and potatoes of the reader - into whatever space is left. Which on the Eee, is precious little. In fact, it only manages to fit in two lines, making it all but useless for looking over your feeds to see what’s new:
Even doing the old CTRL-minus to reduce the text size doesn’t help much - by the time you’ve got a usable number of lines, the text is all but illegible: The solution, after a bit of monkeying about, turns out to be twofold. Most obviously, F11 gets rid of the taskbar at the bottom of the screen, giving you a fair bit more to play with. The extra help comes from using Greasemonkey, by way of grabbing Lifehacker’s Better GReader extension. This lets you fiddle about with the look of Google Reader - the option you want to use is the Minimalistic skin, which lets you get rid of the top bar on Google Reader by simply tapping W. The combination of these two gives you plenty of real estate to browse your feeds in, even with the normal chunky text size: You can, of course, give yourself even more to play with by reducing the text size a bit - it’s still legible with one, or even two, reductions. Not a terribly complex or hard-to-figure out fix, but I couldn’t see it noted down anywhere on a cursory google, so I thought I’d put it here in case anybody else was gnashing their teeth over the issue…


Credit:http://www.flashboy.org/blog/?p=295
10 Secrets To Getting Better Tech Support From Asus
An Asus technician has stepped forward out the shadows to give us the 10 insider tips for getting through and getting better and faster tech support from the computer and computer parts maker. Some things just can't be fixed though, but it's at least to know the soul-crushing math they're using to destroy the customer experience. Considering how bad their tech support is, you're definitely going to need these tips...
Our tipster writes:
If you aren’t aware, Asus makes an estimated 1 in 3 computer main boards sold globally and in addition to their own brand of products also provide system boards to a number of major OEM builders such as HP/Compaq and Dell. In January, AsusTek split into three separate entities – Asus, which deals primarily with Asus-branded PCs and laptops including the wildly popular EEE PC, ‘Pegatron’, which handles the motherboard business (though we keep the Asus brand name on them), and ‘Unihan’, which handles many of the other non-PC related Asus product line. As a result, each entity was suddenly responsible for its own profitability. No biggie, right? Well, as most of your readers know, customer service and support play a key role in the buyer experience. Given that so many products are similar in specification and performance these days, often it’s the after-the-sale support that can mean the difference in long term repeat business and losing a customer.
Not long after the company split, management began obsessing over numbers, and how to make what is normally an accepted expense (customer support) profitable. It was determined that the new company, ‘Pegatron’, would charge the parent company (Asus) for each technical support phone call, email, or live chat session that was received and responded to. While I cannot attest to the actual dollar amount charged for each call, I do know that phone calls generate the most income, followed by live chats, then emails. Ok, you say, no big deal, how does that affect me? Well, that’s what I’m about to show you, with 10 steps anyone can take in an attempt to get the best possible support by circumnavigating the games played with customers to generate revenue.
1. If you need technical support for any Asus product CALL.Do NOT send an email, and use the live support feature at your own risk. A single phone call generates more revenue for the company than a couple of Live Support sessions, and more revenue than half a dozen email responses. As a result, nearly ZERO emphasis is placed on answering them, and emails are often replied to with canned ‘cut and paste’ responses which may not be relevant to your case.
2. Best Times For Calling With Low Hold TimeWhen calling, there are times that give you the best chances to get through with a minimal hold time. Since the support center is based in the Eastern Time Zone, and the best time to call is before 12 noon EST. The very best days to call are Tuesday through Thursday. From Noon-6pm hold times can be somewhat lengthy, as by that time working hours are in play nationwide. At any given time there are only 8-10 staff to take phone calls (yes, we’re grossly understaffed), email queries and answer Live chats. The U.S. office supports all of North America including Canada as well as Western Europe. That translates into a very heavy call volume for a small amount of people.
3. We're stressed, don't take it personallyIf the representative you speak to seems curt, ill tempered, or rude, it’s not on purpose, nor personally directed toward you. All support representatives are instructed to strive for taking 70 calls per day. When you factor in a lunch hour and 2 fifteen minute breaks it leaves 450 minutes in a day. For us to reach our goal, we must be off the phone with you in 6.42 minutes. We aren’t supposed to care that it’s the tenth time you’ve called us (which isn’t toll free), or that you can’t stay on long enough to accurately even describe your issue.
4. Can I take a message?We have recently adopted ‘messaging’ in order to achieve an objective from management that all incoming calls be answered in 60 seconds or less. To that end, we have hired a few people from temp services to answer calls, and when we experience a heavy load, they take your name and number with the promise of a return call. While calls are returned, it may take hours, if not days to get a return call. This serves three hidden purposes. If we message your call, we get paid for taking it even though no support was rendered. When we call you back, we get paid again for making a call. And currently, management has contests running offering cash rewards for most calls handled by a person during the month. Guess what? If we take a message, call you back once or twice, or you yourself call back out of frustration, we may get paid 2 or 3 times before you can speak with someone, all in the name of bonus money.
5. Don't get through? Call back in 10 minutesIf you do get ‘messaged’, you’re better off calling back in 10 or 15 minutes if you have the time. While messages should be returned within 2 hours, it’s often not the case, and generally messaging is done only long enough to clear the incoming call queue, so it’s unlikely you’d be messaged twice in that amount of time. (unless someone is intentionally messaging you, then calling back to generate more revenue and a chance at a nice cash bonus)
6. Write down your case number. Really.When you FINALLY reach someone, you will likely be assigned a case number. This is a good thing, as it will document the nature of the call and enable someone qualified (hopefully, more on that later) to answer your questions. If you already have a case number, please state it when you first begin your conversation, it will give the technician more time to troubleshoot your problem.
7. It's just like in a game, except not funThere are 3 ‘levels’ of tech support. Level 1 technicians primarily answer the phones and generate case numbers. There isn’t much point in trying to go into detail about your problem, as most will have a better grasp of basket weaving than solving PC issues. They will most likely transfer you to our level 2 support, where the fun begins. Many of our representatives are competent enough to handle your questions, but if you EVER question the accuracy of the advice you are getting, you can request to be connected to the top tier of support (Level 3) at ANY time.
8. We have the long-term memory of a snailThe reason you may wish to ask for Level 2 or 3 support immediately is this: Pegatron/Asus offers zero informational training about Asus products – past, present, or future. Typically we are not aware that a new motherboard/router/PDA has hit the street until we start getting calls about it. There is no ‘informational meeting’, no product info cheat sheets, or anything of the sort offered to the support team. Normally, the more senior members are tech-oriented, and stay up to date from home, so your chances improve greatly of getting the help you need by asking for a higher tier. Sadly, even some Level 2 agents are lacking basic skills and cannot help you with BIOS settings, RAID setup, installation of an operating system and so forth, nor will they know offhand the specs of the latest and greatest boards.
9. There is no such thing as a ‘known issue’.Every company that has every produced a physical product has occasionally put out a junk product. We are under direct orders not to confirm ANY problem as a ‘known issue’, EVER. It doesn’t matter if every single model ‘X’ PDA plays ‘Jingle Bells’ every time you turn it on, it’s not a ‘known’ issue and we will not admit to one. If you happen into one of these products that turns out to have ‘known issues’, calling tech support won’t get you anywhere. We will offer to exchange it for an identical product only, which is just as likely to have the same ‘nonexistent’ issue. Since Asus does not sell direct to the public, you won’t be getting a refund either. Sad, but true, so you may wish to browse a few forums and seek outside input before considering any purchase.
10. Merchant refunds and returns are your special friendIf you do have a problem with a new Asus product and are within the return or exchange window offered by your reseller (often 14 to 30 days), don’t waste your time calling us. Simply return the defective product for an exchange or refund. Generally speaking, returning a product to Asus (motherboards in particular), can mean a 2-3 week wait before you see your board returned to you. In addition, it’s likely a refurbished motherboard which likely underwent no extensive testing before being dropped into a Fed Ex box and sent back to you. There is a separate department on the repair floor to handle 2nd and 3rd time returns, and once you’ve reached that level, you r chances of getting a tested board improve marginally. However, these boards won’t be cleaned, and may have thermal paste, grease, smudges, fingerprints, etc on them. It’s no fun to invest $300 in a new top of the line board, only to have an issue with it and get one back that looks like Timmy kicked it down the street for half a mile before putting it in your box. Not fun.
11. BONUS!!!!!If you do weave your way through the Asus maze and find a helpful soul on the other end of the phone, don’t bank on he or she being there if you need them in the future. We have experienced close to 100% turnover in the past year, and those who remain are constantly threatened, both verbally and via email (proof available upon request, Ben) that they will lose their jobs for failure to make objectives. Sad, yes, but painfully true.
Do you have any tips for dealing with Asus, or Asus tech support stories to share? Leave your thoughts in the comments.
Credit:http://consumerist.com/5026046/10-secrets-to-getting-better-tech-support-from-asus
Installing Mandriva 2008.1 on the ASUS Eee PC
The Xandros distribution that comes with the ASUS Eee PC 900 is very simple and a great experience for those new to Linux. For more advanced users, however, it may feel quite confining and limiting. It’s a good distribution considering the target audience of the Eee PC, but installing additional software or a different desktop environment can be quite challenging. There are many distributions that work on the Eee PC besides Xandros, and the ability to boot off of SD cards allows you to keep the default Xandros OS and also boot other distributions. This makes it quite easy to use a whole array of operating systems on the Eee PC if the idea of blowing away the default OS doesn’t sit well....
Out of the many distributions that work on the Eee PC, Mandriva Linux 2008 Spring (or 2008.1) is one that works exceptionally well. It can be installed to the built-in SSD or onto an external SD card. The Eee PC supports the newer SDHC cards which provide larger capacity. For example, a 4GB SDHC card is more than enough to install Mandriva 2008.1, and using the built-in SSD drive for /home, which would share it with the default Xandros install, is more than sufficient.
Because the Eee PC does not come with a built-in CD or DVD drive, you will need an external USB. To begin the install, enter the ASUS Eee PC BIOS and enable all of the hardware devices. This will allow the installer to properly detect all of the hardware. Also make sure that you don’t do the install on battery power; installing to an SDHC easily will take over four hours.
Once the changes have been saved to the BIOS, when the Eee PC boots, press the ESC key and tell it to boot from the external CD or DVD drive. Once the Mandriva installer starts, perform an install as normal. On the Eee PC 900, when you arrive at the step for formatting and partitioning drives, select the advanced options to partition yourself and select the SDHC card; it will most likely be the /dev/sdc device. There will be three devices: /dev/sda would be the first 4GB SSD while /dev/sdb would be the 16GB SSD. On a new SDHC card, you can tell the right device by it being one large FAT partition. Re-partition this to a single partition and mount it as /, or the root partition. Use a journaling filesystem like ext3 or reiserfs.
The only other thing to watch for is to make sure that you do not install GRUB to the system MBR as this would overwrite the boot sector for Xandros. Instead, make sure you install GRUB to the MBR of the media you are installing Mandriva onto, the SDHC card. This will allow you to later set up the BIOS to have the boot order look for the SDHC card first, or you can select it by pressing ESC when the system boots.
Everything else, other than wireless, will be configured correctly for hardware. Wireless will be configured on the first reboot, but you will need to have the Eee PC connected to the Internet via the wired Ethernet port in order to obtain the drivers to configure the wireless network card.
On the first reboot, you’ll note that Mandriva boots much slower than Xandros; this is normal as accessing the SDHC is much slower than the internal SSD but once the system is booted, it will run quite fast and shouldn’t be too slow.
Enter the Mandriva Control Center and be sure to be connected to the Internet to set up the software sources. Remove the original install media and set up a remote source. Next, head to the networking setup; now you can configure the wireless connection since remote sources will have been set up. This is necessary to download the appropriate madwifi packages. You may have to install the various security and bugfix updates first, which include a new kernel and new madwifi packages.
Finally, edit /etc/fstab and make a few changes to minimize the number of writes to the flash memory. Make sure that all of the mounts have the “noatime” option, and you may also use the tmpfs filesystem for things like temporary files and logs. Anything on tmpfs will not persist across reboots, but for a device like the Eee PC, it’s doubtful that you will want to keep log files anyway, so add the following to the end of /etc/fstab:tmpfs /tmp tmpfs noatime 0 0tmpfs /var/log tmpfs noatime 0 0tmpfs /var/tmp tmpfs noatime 0 0
One final point to note: Regardless of what distribution you install to an SD or SDHC card, you will not be able to suspend/resume, so ensure you do proper shutdowns. Due to the card reader being on the USB bus, suspend/resume does not, as of yet, work properly because of how the kernel interacts with USB devices. Other than that, everything should work as if you installed to the internal SSD.
Cerdit:http://blogs.techrepublic.com.com/opensource/wp-trackback.php?p=243
Install extra packages on the ASUS Eee PC
Installing extra packages on the Asus Eee PC is possible if you want more software than the average user. Vincent Danen explains how to set up Xandros repositories to make it easier to add packages.
————————————————————————————————————–
While the ASUS Eee PC and the Xandros distribution it ships with come with enough software for the average person, some users will eventually want to install other software. The Eee PC does not make this particularly easy, but because it comes with a light Xandros install, it is simple to set up Xandros repositories to provide extra packages to install.
To begin with, open a terminal by pressing CTRL-ALT-t; there is no shortcut icon for the terminal. Once the terminal is open, edit the /etc/apt/sources.list file by executing sudo nano /etc/apt/sources.list; vim is also available if you prefer.
When the file is open, navigate to the end of the file and add the following lines to it:deb http://xnv4.xandros.com/xs2.0/upkg-srv2 etch main contrib non-freedeb http://dccamirror.xandros.com/dccri/ dccri-3.0 maindeb http://www.geekconnection.org/ xandros4 maindeb http://download.tuxfamily.org/eeepcrepos/ p701 main etch
Save the file and exit. Next, create the /etc/apt/preferences file and edit it. Because multiple extra repositories have been added, care must be taken that if there are any duplicate versions of the same software, the Xandros-supplied ones will always come first. This is accomplished by using “pinning”, which will indicate to apt which repositories take higher preference than others. Add the following to /etc/apt/preferences:Package: *Pin: origin update.eeepc.asus.comPin-Priority: 950Package: *Pin: originPin-Priority: 925Package: *Pin: origin xnv4.xandros.comPin-Priority: 900Package: *Pin: origin dccamirror.xandros.comPin-Priority: 850Package: *Pin: origin www.geekconnection.orgPin-Priority: 750Package: *Pin: release a=stablePin-Priority: 700Package: *Pin: release a=testingPin-Priority: 650Package: *Pin: release a=unstablePin-Priority: 600
Now use apt to update the repository metadata:$ sudo apt-get update
Once this is done you can use apt to install software that does not come with the default Xandros OS. For instance, to install the text editor joe, use:$ sudo apt-get install joe
Apt also allows you to see what dependencies may be pulled in when you attempt to install packages by performing a dry-run install transaction. This is very good idea to keep from getting a system full of dependencies you did not expect. This can be done by adding the -s argument to the apt-get command:$ sudo apt-get -s install joe
Getting new packages installed onto the ASUS Eee PC is not difficult, and the setup is required only once. From this point forward, any application built for Xandros or third-party applications compiled specifically for the Eee PC are now available. You can also use this to upgrade packages that were previously installed on the Eee PC, by doing:$ sudo apt-get -s dist-upgrade
This will provide a list of available packages to upgrade. Omit the -s option to perform the actual package upgrades.
Credit:http://blogs.techrepublic.com.com/opensource/wp-trackback.php?p=244
Eee PC Tips: A crash course in Linux
 So you're an early adopter and you've run out to buy yourself Asus's $400 Eee PC because it seemed like a great price for a fully functional 2 pound computer that's about the size of a typical hardcover book (and far smaller than Harry Potter and the Deathly Hallows).
But the innovative easy to use interface might get old pretty quickly if you want to do more than surf the web and create letters, spreadsheets, and PowerPoint style presentations for your friends telling them how cool you are because you have an Eee PC while they don't.
Asus includes instructions for loading Windows XP onto the Eee PC, but it requires an external DVD drive, some drive compression, and you know, a copy of Windows XP. Curiously, Asus does not include any instructions for unlocking the built-in potential of Xandros Linux, the operating system that ships with the Eee PC. But as we mentioned in this week's Squadcast, it just takes a little bit of work to unlock this machine's potential.
If you've got a bit of Linux experience under your belt, it's pretty simple to add some programs, enable an advanced desktop, and tweak the Eee PC to your heart's content. But it turns out that even if you're a Linux noob, the learning curve isn't that steep. Here are some of the most useful Eee hacks/tweaks we've discovered in our first half week of playing with it. Thanks to the Eee User community for helping inspire our hacking.
Enabling Full Desktop Mode
Earlier this year, we heard that Asus would be releasing a Linux-based desktop that would compete with the OLPC XO computer. But the Eee PC would look like a computer for grownups, not a Fisher Price toy. And it would be available in both developed and developing nations. Oh yeah, and while Asus was slapping a new super-easy to use interface on the PC, there would also be a "Full Desktop" mode that would look more like Windows/your typical Linux distribution with the KDE desktop installed.
As it turns out, when we got our hands on the Eee PC, there was no full desktop mode enabled. Asus probably wanted to cut down on the customer service calls it would be getting if people could easily install and remove unsupported applications. So the Eee PC ships with "Easy Mode" enabled, and no clear way to set up the full desktop. The problem is that in Easy Mode, you have access to just a handful of software updates from Asus's server. There's no simple way to install GIMP, Audacity, or any other open source application you may have your heart set on.
We say no, easy way, because it turns out you can pull up a terminal in easy mode and use apt-get. And that's exactly what we're going to do in order to enable the full desktop. You could just use apt-get to install all the software your heart desires without ever enabling full desktop mode. It would certainly save you a few MB of precious memory (while the Eee PC has 4GB of solid state storage, only about 1.3GB is available, since the OS eats up a large chunk). But it's also more of a headache to do everything from the command line if you're used to graphical user interfaces.
- Open up a terminal buy pressing Ctrl+Alt+T
- Type "sudo bash" to gain root access (Be careful what you do with root access. The only reason we're using it now is so that you don't have to type sudo before each command. But you could easily mess up your machine if you perform every command as an administrator)
- Type "apt-get update" to make sure you have access to the most up to date packages
- Type "apt-get install kicker" and answer "y" when asked if you want to install
- Type "apt-get install ksmserver" and answer "y" when asked if you want to install
- Type exit to leave the root account
- Type exit to close your terminal window

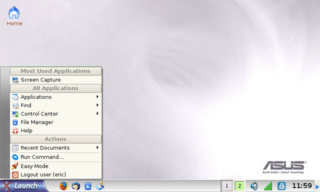
Press it and your Eee PC will reboot into Full Desktop mode, which should look something like this:

Now you have access to a full start menu, program launcher, taskbar, and several applications that were hidden in easy mode, including an RSS reader, remote desktop client, and the Synaptic Package Manager, which makes installing new programs a whole lot easier.
When you shut down and restart your Eee PC, you will continue to boot into easy mode. But if you want to boot into full desktop mode every time, just select the Settings tab in easy mode, click on Personalization, and then select the check box next to Full Desktop Mode.
Update: While the method above shows the easiest way to enable full desktop mode, be forewarned that you will not be able to save anything to your desktop. Files saved to your desktop will disappear each time you reboot your PC. You can either save files and icons to other folders, or you can edit your simplestart.sh file according to the instructions at EeeUser. If you follow that link you'll note that a new method for enabling the advanced desktop has been devised since this article was originally published, but you'll have to rely on downloading files from an unofficial repository created by Eee users.
Installing unsupported applications
There are three ways to install applications on the Eee PC.
- You can use the apt-get command in a terminal window like we just did to install the full desktop.
- You can download, uncompress, and install applications manually using a terminal. We really don't recommend this method, as it's not user friendly at all. But if you want to install, say, the latest version of the Opera web browser for Linux, this method might work best.
- You can use the Synaptic package manager which is a graphical interface for apt-get. This is the method we recommend.
Great. Now you can see a list of installed applications and a tiny tiny number of uninstalled, but available apps. There are thousands of other programs out there that will run perfectly on your Eee PC, but right now it's only set up to access files available from Asus's server. So the next thing we need to do is add some repositories. This will give you access to other applications that run on Xandros or other Debian-based Linux distributions.
Keep in mind, these other applications might not fit well on the Eee PC's 800 x 480 pixel screen. And they might not like its hardware configurations either. If you want the least possible risk of messing up your new toy, only install applications from Asus's server. But if you're willing to take a few risks, read on.

Although you can add Debian repositories and access a huge library of applications, we recommend sticking with Xandros repositories as those applications are designed to run on the variant of Linux the Eee PC uses. If you can't find what you're looking for in the Xandros repositories, you might want to try "deb http://http.us/debian.org/debian/ stable main."
Keep in mind, these other applications might not fit well on the Eee PC's 800 x 480 pixel screen. And they might not like its hardware configurations either. If you want the least possible risk of messing up your new toy, only install applications from Asus's server. But if you're willing to take a few risks, read on.
- Open Synaptic
- Select the Settings Tab
- Select the Repositories option
- You should see two entries. Select New to add some more.
- Enter the URL on the first line and the distribution and extra information on the following lines. For example, if you read somewhere that you can install "deb http://www.archlug.org/apt/ xandros4 xorid/uploads" you would enter "http://www.archlug.org/apt/" (without quotes) on the first line, "xorid" on the second, and "uploads" on the third.
Although you can add Debian repositories and access a huge library of applications, we recommend sticking with Xandros repositories as those applications are designed to run on the variant of Linux the Eee PC uses. If you can't find what you're looking for in the Xandros repositories, you might want to try "deb http://http.us/debian.org/debian/ stable main."
Eee User has posted a list of relatively safe repositories to their wiki.
Now it's time to install something. Let's try Audacity, an open-source audio editor that runs on Windows, OS X, and Linux. First up, let's make sure the Debian repository is added. And then we have to hit the Reload button at the top left of Synaptic in order to refresh the list of available programs.
- Click the search button and enter Audacity (you could also enter GIMP, or any other program you're looking for).
- Right click the checkbox next to Audacity and select Mark for installation.
- Click Apply and Synaptic will download and install the application.

Once you have you repositories installed, you can also add and remove programs from the terminal by typing "sudo apt-get install" and "sudo apt-get remove." For example, "sudo apt-get remove Audacity." This could come in handy if Synaptic doesn't want to remove an application once you've installed it, which has happened to us a few times so far.
Adding a start menu in easy mode
If you expect to switch back and forth between full desktop and easy mode occasionally, you might want to add a start menu to easy mode. It won't be as attractive or full featured as the start menu in full desktop mode, but you can customize the start menu and add applications that don't show up in the tabbed interface. Somewhat ironically, this process is a bit more involved than enabling the full desktop mode.
Thanks to Notebook Review for the tips on enabling the start menu.
- Open a terminal in easy mode by pressing Ctrl+Alt+T
- Type "sudo bash" to gain root access
- Create a hidden folder by typing "mkdir /home/user/.icewm"
- Copy a config file to your new directory by typing "cp /etc/X11/icewm/preferences /home/user/.icewm/"
- Copy your menu editing file by typing "cp /etc/X11/icewm/menu /home/user/.icewm/"
- Type "nano /home/user/.icewm/preferences" to open an editor
- Scroll down until you find "TaskBarShowStartMenu," and change the 0 to 1
- Hit Ctrl+x to exit

Unfortunately, there's pretty much nothing useful in your start menu. You're going to want to edit the menu file in order to populate the menu with programs.
- Type "nano /home/user/.icewm/menu" to open up your menu file in an editor.
- Create new entries under the appropriate sections following the format "prog 'title' icon_name program_options." In other words, adding prog Audacity Audacity will add a shortcut to bring up Audacity.
Conclusion
Whew. That might be a lot to take in all at once if you've never used Linux before. But once you've enabled your full desktop and figured out how to use Synaptic, we suspect you'll never look at easy mode again. The Eee PC really is a full fledged laptop computer, with a 900MHz processor, 512MB of RAM, and 4GB of internal memory, plus an MMC/SD/SDHC card slot for extra storage. It also does a pretty good job of supporting external hardware like monitors, USB hard drives or CD/DVD drives, mice and keyboards. So if you can get used to typing on a teeny weeny keyboard, you could almost replace your 6 pound laptop with this 2 pound puppy.
Credit:Brad Linder
Subscribe to:
Posts (Atom)


 My StumbleUpon Page